Iron Owner’s Help Guide: From Wrinkled To Ready
Quick start you can finish fast
Your Iron is simple once you know the basics. This gets you from box to first pressed shirt without drama.
Fast setup checklist
- Place the Iron on a stable, heat-resistant, flat surface with plenty of space around it.
- Remove all packaging, stickers, and any protective films from the soleplate and body.
- Check that the power cord is intact, with no cuts, kinks, or exposed wires.
- Open the water fill cover (if present), and fill with clean tap or distilled water up to, but not past, the MAX line.
- Close the fill cover securely so water cannot splash out when you tilt the Iron.
- Set the temperature dial to the lowest setting and make sure the steam control is set to “dry” or minimum.
- Plug the Iron directly into a wall outlet, not an extension strip with many heavy appliances.
First-use example: Pressing a cotton T-shirt
This is a safe, forgiving first run to get used to the Iron.
- Fill the Iron with water as above if you want steam; otherwise, you can run dry.
- Set the temperature dial to a medium–high range suitable for cotton (often around 300–350°F / 150–180°C on the cotton/linen zone).
- Allow the Iron to preheat until the indicator light cycles off, usually within about 2–5 minutes.
- Place the T-shirt flat on the ironing board, smoothing major wrinkles with your hands first.
- Start with a small area, moving the Iron in smooth, straight strokes, lifting between passes instead of dragging back and forth in place.
- Use steam bursts sparingly at first so you can see how strongly your Iron outputs steam.
- Unplug the Iron when done and let it cool on its heel rest before storing.
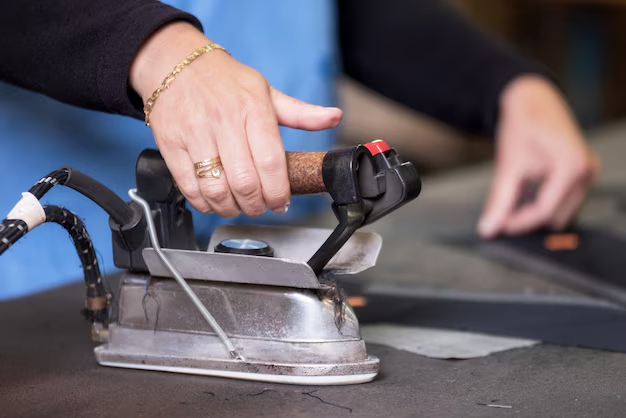
Know your parts without guessing
Most units have
- Soleplate – The flat heated surface that contacts the fabric. Comes in materials like stainless steel, ceramic, or non-stick coating.
- Heel rest / base – The rear “stand” that lets the Iron sit upright safely while hot.
- Handle – The grip you hold. Often includes integrated controls.
- Temperature dial or buttons – Sets heat level for fabric types like nylon, silk, wool, cotton, and linen.
- Indicator light – Shows when the heating element is active. Often turns off or cycles when desired temperature is reached.
- Water tank – Built into the body. Holds water for steam generation.
- Fill opening / cap – Where you pour water into the Iron. Sometimes has a flip cover.
- Steam vents – Holes on the soleplate that release steam into the fabric.
- Power cord – Supplies power; usually swivels where it enters the Iron to reduce tangling.
- Steam control – Slider or dial to adjust steam output from off/dry to maximum steam.
- Spray button – Spritzes a small amount of water on stubborn wrinkles.
- Steam boost button – Sends a concentrated burst of steam for heavy creases.
Some units have
- Auto shut-off feature – Turns the Iron off after a period of inactivity for added safety.
- Self-clean button – Flashes hot water and steam through the vents to flush mineral deposits.
- Vertical steam mode – Allows using the Iron upright to steam hanging garments or curtains.
- Cordless base – Iron heats on a charging base, then can be used off-cord for short bursts.
- Anti-drip feature – Reduces water drips when ironing at lower temperatures.
- Anti-scale cartridge – Helps reduce limescale buildup inside the Iron’s water system.
Safety that actually prevents problems
- Always set the Iron upright on its heel rest when not gliding on fabric. This protects fabrics, boards, and the soleplate.
- Keep the Iron and its cord away from the edges of tables or boards where it could be pulled down accidentally.
- Use only water in the water tank. Fragrances, starch sprays, or cleaners can clog vents and damage internal parts.
- Unplug the Iron by pulling the plug body, not the cord, to avoid loosening connections.
- Let the Iron cool completely before wiping the soleplate or storing it, so you do not damage surfaces or coatings.
- Keep the Iron clear of children and pets while it is heating, in use, or cooling.
- Do not leave the Iron unattended while it is face-down on fabric, even for a brief moment.
- Do not immerse the Iron in water or use it if it has been wet inside the body or cord connector.
- Stop using the Iron immediately if you see smoke from the body, sparking at the cord, or smell strong burning plastic.
- Use the Iron only with properly grounded outlets and avoid sharing a power strip with high-draw appliances.
- Do not use the Iron on unstable or soft surfaces like beds or upholstered furniture.
- Check labels on delicate fabrics first; if in doubt, test on a hidden inner seam at a lower setting.
Daily use for better results
Think of a simple rhythm: prepare, set, test, then glide.
- Set up a sturdy ironing board or flat, heat-safe surface covered with a thick cotton pad or cloth.
- Sort clothes roughly by fabric: synthetics and silk, then wool, then cotton and linen last. This lets you raise heat as you go.
- Fill the Iron’s water tank up to the MAX line if you plan to use steam. Wipe off drips before plugging in.
- Plug in the Iron and select a temperature that matches your first fabric group. Set steam level to match the temperature; more steam typically works best at higher heat.
- Wait for the preheat light to go off or cycle. Do a quick test on a thick area, such as a hem or inner facing.
- Lay one garment at a time on the board, smoothing it with your hands before contacting it with the Iron.
- Move the Iron in smooth, continuous strokes, lifting to reposition instead of grinding in place over buttons, zippers, or prints.
- Use the spray or steam boost for stubborn wrinkles, but allow a short pause so excess moisture can evaporate.
- Hang each finished piece immediately to cool and “set” flat rather than piling it up warm.
- When done, turn temperature and steam controls to minimum, unplug the Iron, and let it cool on its heel rest before emptying the tank.
Helpful starting settings and cues
| Fabric / Task | Suggested heat / steam | Doneness / finish cues | Common mistakes |
|---|---|---|---|
| Cotton T-shirt | Medium–high heat, medium steam | Shirt feels dry, smooth, and warm; seams lie flat | Using low heat so wrinkles reappear quickly |
| Cotton dress shirt | Medium–high heat, medium to high steam | Cuffs, collar, and placket crisp but not shiny | Pressing too long on collar tips, creating shine |
| Linen trousers | High heat, high steam | Fabric looks relaxed but with clear creases where wanted | Under-steaming, which leaves deep creases barely improved |
| Wool sweater (with cloth) | Low–medium heat, light steam, with pressing cloth | Surface looks smooth without flattened texture | Direct contact without cloth, flattening the knit |
| Silk blouse | Low heat, minimal or no steam | Wrinkles softened, fabric still fluid and not stiff | Too much steam causing water spots |
| Synthetic sportswear | Low heat, dry or very light steam | Logos stay flat; seams smooth | Using cotton setting, risking melting or shine |
| Jeans | High heat, high steam | Legs smooth; thick seams pliable, not wavy | Skipping steam and dragging the Iron over bulky seams |
| Vertical steaming of dress | High heat, high steam, vertical mode if available | Wrinkles relax as you see fabric fall smoother | Holding Iron too close and dripping water on fabric |
Cleaning and maintenance that doesn’t ruin parts
After each use
- Turn temperature and steam controls to minimum and unplug the Iron while it is on its heel rest.
- Let it cool until only slightly warm, then empty any remaining water from the tank into a sink.
- Wipe the soleplate with a soft, damp cloth while still mildly warm to remove fresh residue.
- Wipe the exterior body dry and ensure the cord is untangled before storing.
Weekly care (frequent users)
- Check the steam vents for lint or mineral flecks and gently wipe them with a soft cloth.
- If your Iron has a self-clean button, use it with the tank filled to the indicated level, holding the Iron over a sink or basin to flush out mineral buildup.
- Inspect the cord for any new kinks, crushed spots, or wear at the entry point to the Iron.
When it smells weird or performs poorly
- If you smell a sour or stale odor, run the Iron with clean water and use the steam function over an old towel to flush residues.
- If steam output is weak or uneven, perform a more thorough self-clean cycle or, if no button is provided, repeatedly press steam bursts while moving over a towel.
- If the soleplate feels sticky on fabric, clean it gently with a damp cloth and a small amount of mild dish soap, then wipe again with a clean, damp cloth.
What not to do
- Do not scrape the soleplate with metal tools, knives, or abrasive scouring pads. These leave scratches that catch fabric.
- Do not use harsh chemicals like oven cleaner, bleach, or strong solvents on the soleplate or water tank.
- Do not store the Iron with water in the tank; this encourages mineral buildup and odors.
- Do not wrap the cord tightly around a hot Iron; wait until it is fully cool and coil the cord loosely.
- Do not pour vinegar or descaling chemicals into the tank unless the Iron’s manufacturer explicitly allows it.
Quick maintenance checklists for common complaints
Iron leaves spots or stains:
- Empty tank and refill with fresh, clean water.
- Use steam over an old light-colored cloth or towel until no new spots appear.
- Wipe the soleplate thoroughly after the flush.
Iron no longer glides smoothly:
- Allow the Iron to cool until warm, then unplug.
- Wipe soleplate with a soft cloth and mild dish soap; avoid getting water into the body.
- Buff dry with a clean, soft cloth until the surface feels slick again.
Troubleshooting that gets you unstuck fast
Use this section when your Iron starts acting like it has an opinion about your laundry.
Mini decision path: If your Iron will not heat
- Check that the outlet works by plugging in another small device.
- If the outlet works, verify the Iron’s power switch (if present) is set to ON and the temperature dial is above the lowest or “off” mark.
- Confirm the indicator light comes on when you adjust to a hotter setting.
- If the light never turns on and the cord looks damaged, stop using the Iron.
- If the light comes on but the Iron stays cold after several minutes, stop using it and seek service.
Common issues and fixes
| Symptom | Likely cause | Fix |
|---|---|---|
| Iron not heating at all | Outlet has no power, temperature dial set to minimum, or internal failure | Test outlet with another device, raise temperature setting, try another outlet; if still cold, discontinue use and get service. |
| Iron heats but indicator light never turns off | Indicator bulb or light circuit issue | Use only if temperature feels normal and stable; if the Iron overheats or smells hot, unplug and seek service. |
| No steam even with water in tank | Steam setting on dry or low; temperature too low for steam; vents clogged with mineral deposits | Increase temperature into steam range, set steam control higher, and run self-clean or flush steam over a towel to clear vents. |
| Water leaking from soleplate | Using steam at very low temperature, overfilled tank, or rapid tilting | Use steam only at medium–high to high heat, keep water level at or below MAX, keep Iron level when heating. |
| Water leaking from fill opening | Fill cap not closed, Iron tilted forward too far | Close or press down the fill cover firmly and keep Iron in upright or flat position, not sharply pointed downward. |
| Brown or white flakes on clothes | Limescale or rust in water chamber or vents | Perform a thorough self-clean or flush with clean water and steam onto an old cloth until flakes stop. |
| Shiny marks on fabric | Heat too high for fabric, pressing too long on one spot, or no pressing cloth on delicate areas | Use a lower temperature and iron from the reverse side with a thin cotton cloth between Iron and fabric. |
| Iron sticks or drags on fabric | Soleplate dirty or coated with melted fibers; temperature too low to smooth heavy fabric | Clean soleplate gently; use proper heat for fabric type and add steam to help glide. |
| Iron turns off during use | Auto shut-off feature triggered by inactivity or position | Move or tilt the Iron slightly to reactivate; continue ironing as normal once heating resumes. |
| Clicking sounds while heating | Thermostat cycling on and off | This is usually normal; if combined with strong burning smell or smoke, unplug and seek service. |
| Steam output weak and inconsistent | Low water level, mineral buildup, or using steam at the lower end of temperature range | Refill tank, raise temperature slightly, and run a cleaning cycle or repeated steam bursts over a towel. |
| Soleplate discolored | Starch, synthetic fibers, or residue baked onto the surface | When cool but slightly warm, wipe with a soft cloth and mild soap; avoid abrasives and test on a small area first. |
When to stop and get service
- The power cord is frayed, cracked, or loose where it enters the Iron.
- You see sparks, charring, or melting on the plug, cord, or Iron body.
- The Iron emits strong burning plastic smells even at lower temperatures.
- The Iron stays extremely hot regardless of temperature dial setting.
- Water leaks heavily from inside the Iron body, not just from vents or fill opening.
- The casing is cracked or separated so that internal components are visible.
- The Iron has been dropped hard and no longer sits flat or stable on its heel rest.
In these situations, unplug the Iron, let it cool, and avoid using it again until it has been inspected or replaced.
Smart habits that save time
Storage tips
- Empty the water tank after each session so the Iron is dry inside before storage.
- Let the Iron cool fully on its heel rest, then coil the cord loosely around the handle or alongside the body.
- Store the Iron in an upright position in a dry place away from direct sunlight and moisture.
Using accessories wisely
- Use a plain cotton pressing cloth for delicate fabrics or dark garments prone to shine.
- If you use spray starch, apply it lightly to the garment, not into the water tank, and clean the soleplate more often.
- If using a silicone or metal Iron rest, make sure it is on a heat-resistant, stable surface before placing the hot Iron on it.
Time-saving habits
- Group clothes by fabric type so you can iron all low-heat items first, then raise heat for heavier fabrics without constantly adjusting.
- Hang garments right after washing and partially air-dry them on hangers; slightly damp fabric irons faster and better.
- Keep a small spray bottle of clean water nearby to re-dampen stubborn areas instead of overusing the Iron’s spray button.
Quick FAQ
Can I use distilled water in my Iron?
Most Irons work well with tap water, but if your tap water is very hard, mixing about half tap and half distilled water can reduce mineral buildup. Avoid using only additives or scented waters inside the Iron.
How long should it take for my Iron to heat up?
From cold, most Irons reach a mid-range temperature in about 2–5 minutes. Higher heat settings can take slightly longer, and the indicator light usually cycles when it is ready.
Why does my Iron spit water when I use steam?
This happens when the soleplate is not hot enough to turn water into steam or when the tank is overfilled. Raise the temperature into the safe steam range and keep water below the MAX line.
Can I leave water in the Iron between uses?
It is better to empty the tank after each use. Standing water encourages mineral buildup, clogs vents, and can cause odors or staining over time.
Is it safe to use my Iron on printed T-shirts?
Yes, but iron from the inside of the shirt or use a pressing cloth and a lower heat setting. Direct high heat on prints can cause them to stick or distort.
What should I do if I accidentally scorched a garment?
Unplug the Iron, lift it off immediately, and remove the garment from the board. Once the Iron cools slightly, check and gently clean the soleplate so residue from the scorch does not transfer to the next item.
Why does my Iron make a clicking or popping noise?
Light clicking is usually the thermostat turning the heating element on and off. Loud cracks, persistent pops, or accompanying smells are not normal; unplug and inspect if you are unsure.
Can I use my Iron as a handheld steamer for curtains?
Some Irons offer vertical steam and work well for this. Set to a suitable steam setting, hold the Iron a short distance from the fabric, and move steadily downward so condensed water does not drip.
How do I avoid shine on dark suits and pants?
Use a pressing cloth, reduce heat slightly, and iron from the inside when possible. Avoid pressing hard on seams and pockets where fabric is doubled.
Is storing the Iron on its soleplate okay?
It is best to store the Iron upright on its heel rest. Long-term storage on the soleplate can stress the cord entry point and risk surface damage if the area is not perfectly clean.
Can my Iron be used on a travel voltage converter?
If your Iron is not rated for dual voltage, a travel converter that cannot handle the Iron’s wattage can overheat. Use only with appropriate power ratings or choose a travel Iron that is built for the local voltage.
Discover More
- Air Conditioner
- Air Fryer
- Air Purifier
- Automatic Soap Dispenser
- Barbecue Grill
- Beverage Cooler
- Beverage Dispenser
- Beverage Fridge
- Blender
- Boiler
- Bread Maker
- Bread Slicer
- Bread Toaster Oven
- Can Opener
- Carpet Cleaner
- Ceiling Fan
- Ceiling Heater
- Ceiling Mounted Heater
- Ceiling Mounted Vent Fan
- Central Vacuum
- Charcoal Grill
- Citrus Juicer
- Clothes Dryer
- Clothes Steamer
- Coffee Grinder
